Learn how to make coffee using a mason jar and a strainer from an infographic.
Cold brew coffee is one of the least expensive coffee preparation methods. You already have the equipment in the kitchen. No need to buy an expensive coffee maker, or a scale, or other fancy utensils, unless you want it.
The other great thing about cold brew is that is less hard on people with sensitive stomachs. The reason is not fully understood, but we have a little explanation in our article about the health benefits of cold brew coffee.
As a general rule, very dark roasts are not the best because they can give off an ashy taste. However, some roasters are perfectly capable of roasting very dark without burning the beans at all. We have a guide on how to choose the best beans for cold brew if you need some ideas.
One more thing before diving in, this is a recipe for immersion cold brew, which means that ground coffee is fully immersed in the water, and steeped. The method is slow and you should brew larger quantities. Although you can use any mason jar and a strainer, using an immersion cold brew coffee maker such as Toddy, or Oxo, is best.
Here is the full recipe with quantity suggestions. The reason the quantities are just suggestions is that cold brew can be brewed into a concentrate and diluted with water and milk. Extracting a concentrate helps mitigate the longer preparation times.
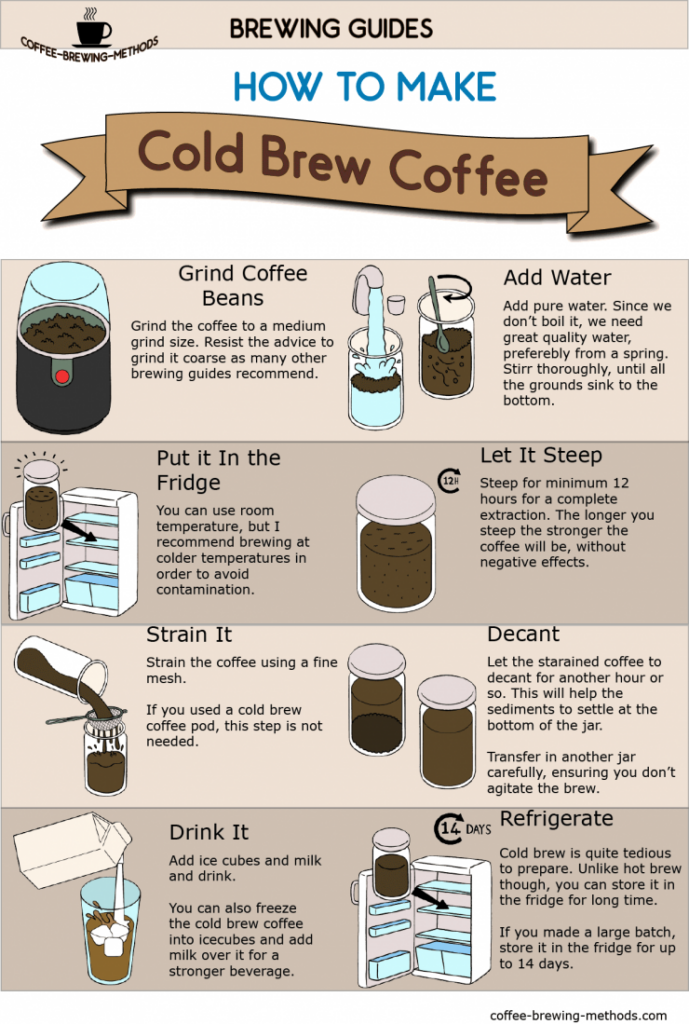
- Grind coffee beans to a medium grind size. While most cold brew guides recommend you to use coarse grind, we recommend medium grind. This improves the extraction and makes you a stronger coffee that you can dilute. Grind 1 ounce of coffee beans for every cup of water.
- Use a mason jar or any other tight lid recipient. Mix the ground coffee with the water and stir vigorously until most of the grounds sink to the bottom of the jar. Use good quality water like with any other brewing method.
- Place the lid on and store it in the fridge. You can also steep at room temperature, but there are more chances to contaminate the drink. Bacteria like it better at room temperature.
- Let it steep for 12 to 72 hours. The longer you let it steep the better the extraction. You’ll just need to dilute the concentrate more.
- After the steeping phase is done, take out of the fridge and strain it using a fine mesh or a cheesecloth. If you used a cold brew coffee pod you can skip this step.
- When you use a mason jar and a cheesecloth the result is a little cloudy and muddy. You need to let the brew decant for about an hour. After all the sediments have settled at the bottom, slowly transfer the clear stuff in another jar or bottle making sure to not stir the sediments up.
- Now it’s time to drink. Add ice cubes and milk and enjoy. I love to freeze the cold brew into coffee ice cubes for a stronger coffee through the end of the cup. You need to dilute this stuff because as is it is too strong. Use about 1/2 cup cold brew coffee to 1 cup of iced water. Adjust this to your taste.
- You probably brewed more than half a cup, in which case you can store the rest in the fridge for up to two weeks.
If you need a more thorough guide, check our cold brew coffee tutorial. We also have a review of other cold brew methods, including vacuum, stirring/agitation and gravitation, (drip cold brew).